


[Tutorial] XSI Modeling Tutorial
from  Sins Forums
Welcome to my tutorial! This tutorial series is designed to take you through all the steps from deciding to model a ship all the way to importing it in-game. This first part is specifically devoted to the modelling of ships in XSI Modtool. It is the program I have used for all my ships, and I find it incredibly versatile and easy to use, and hopefully this tutorial will convince you of the same!
Ok, first thing comes first. If you are planning on modelling a ship that has already been created before, i.e. from your favorite show or movie, I highly suggest gathering resources for the modelling process. For this tutorial, I decided to model the Galaxy Class Starship from ST:TNG. I searched the internet and my favorite databases and found several good blueprints/schematics as well as reference photos.

Once you have these, you're ready to go into Modtool and start making your model. Now, I'm going to assume that some of you have never opened mod tool before and have no idea what you are looking at, so I will take you on a walk around the screen.

1) this is where most of the actual creation begins. Use this button to bring up the object creation panel, allowing you to create basic shapes and curves.
2) useful for merging objects into one mesh.
3) used to apply textures and texture projections to your model.
4) used for exactly what you would expect, tweaking your models. the weld points function is especially useful.
5) these are buttons I've added myself to the toolbar so I don't have to go searching through menus and what-not to get the function I want. To add a button, right click on a blank portion of the toolbar and click the add button function. You can then drag names of functions from the list directly to the toolbar to add a button for them. I would suggest adding a button for beveling, slicing polygons, freezing scaling, freezing rotation, and freezing translation.
6) When manipulating a point/polygon/edge in your object, if this option is selected, it's counterpart on the opposite side of the axis will move also. You can adjust this (i.e. change the axis that the symmetry is mirrored across) by right clicking on the button.
7) This button adjusts whether or not the changes you are making are taking place from the center of gravity of your current selection.
8)similar to the COG option, adjusts the reference from which the changes are made.
9)the translate tool this repositions your selection in space. By clicking on the individual axis on the right panel, you can manipulate the position of your object in just one axis. To select more than one, just hold Ctrl while clicking on the Axises of your choice! to select all three quickly, click the little button in the lower right hand corner that looks like a pill. This ability to select individual axis applies to Scaling and Rotation too, just in thier respective panels.
*The hot key for this is V
10) Rotation tool, similar to translation, but rotates in the three axis instead.
*The hot key for this is C
11) Scaling tool. Again similar to rotation and translation, except it changes the size of your selection.
*The hot key for this is X
12) These are the buttons used for selecting the different components of your model. Raycast select uses a paintbrush method of selection, and only selects components not obscured by other components (i.e. if you have two planes, one right in front of the other, you can only select components of the plane closest to you.) Rectangle select selects using a selection box and will select all components contained in the selection box, whether or not they are obstructed.
>>Side note!
Forgot to mention the button directly above 13, the Objects select button. this allows you to select entire polymeshes by simply clicking on them
*hot key for this is Spacebar
13) these buttons exist in each of your view windows, and when clicked will full screen that view. Useful when you are working with fine details.
14) The Orbit button. This is how you navigate in the view screens. when selected, you can pan in a view screen by clicking and dragging with the left mouse button, zooming by clicking and dragging with the middle mouse button, and orbiting by clicking and dragging with the right mouse button.
*The hot key for this is S
I believe this is all the basic buttons you need to know to begin modeling, but I may come back and add more definitions as people request or as I see fit.
One important thing that will greatly speed up your modeling is LEARN THE HOT KEYS! They are quite awesome and and have this stacking ability, so if you press a hot key to activate something, you can press it again to return to the previous function without having to select that function again. Also, if you hold down a hot key, the function of that key will only stay active as long as you hold it. Useful if you want to simply pan/change angles in a screen, you can hold down S, change views, and release, and you're back to the function you had before!
The techniques I am about to show you are in no way the only techniques to use, and many people would recommend others in place of these. The best way to model is to develop your own technique by using someone else's as a base, and customizing it with your own tricks and techniques you develop as you gain more experience.
That being said, here is how I make my models!
The first thing you will want to do if you have managed to gather some good profile shots of your subject is to rotoscope them into your separate views.

To do this, right click on the box directly to the left of the minimize/maximize button and go down to the rotoscope option. That will bring up a menu like this.

To add your picture, go to the NEW button, and select New from file. then find the path to your image and it should now be added to the image resources of your scene. You can now adjust the scale and posistion of the image to fit your needs. Make sure the Image Placement setting is set to Fixed, otherwise, the rotoscope will be of no benefit to you. You can also select Show in All Views to make your image appear in the 3d viewscreen. I find this very helpful, especially at the begining, but others may not find it as helpful. You can then repeat this process for the other two viewscreens and with a little adjusting of size and position of each object, should get something like this.

Once you have this you can move the images out of the way so they do not interfere with your view of the 3d workspace or you can leave them as they are, that is your own personal preference.

Now that you have pictures rotoscoped, you can now move on to the creation of the polymesh. You will want to mentally divide your model into somewhat symmetrical or inclusive parts to begin modeling. I chose to divide the Galaxy into the Saucer, Engineering Hull, and Warp Nacelles.
Once you have selected an area to model, create a primitive (object [button #1 on list]) that seems most appropriate for the section at hand. Because it was pretty obvious, and because of the technique I most employ, I chose a cylinder for the saucer section.

Once you have created a primitive, a menu should appear allowing you to adjust the various geometric aspects of your newly created object. This menu can be accessed at any time by selecting the primitive you want to modify and pressing Enter. The important things to adjust now are under geometry, and define how complex your final object will be. The proportions of your primitive (Radius and Hight in this case) are not as important as we will be changing them quite a bit in the near future.

You will also notice that I have positioned the cylinder over the saucer and have used the x and z scaling to match the cylinder to the saucer section of the Galaxy. Not visible in the above shot is that I have also reduced the size of the cylinder in the y axis so it is no more than a thin slice.

Here's where the real work begins. First I select all the polygons on top and then using Ctrl + D, I duplicate them, thereby making exact replicas of the original polygons on top and connected to the originals. I then use Translate and Scale to reposition this layer and effectively make a new "Slice" of the saucer.

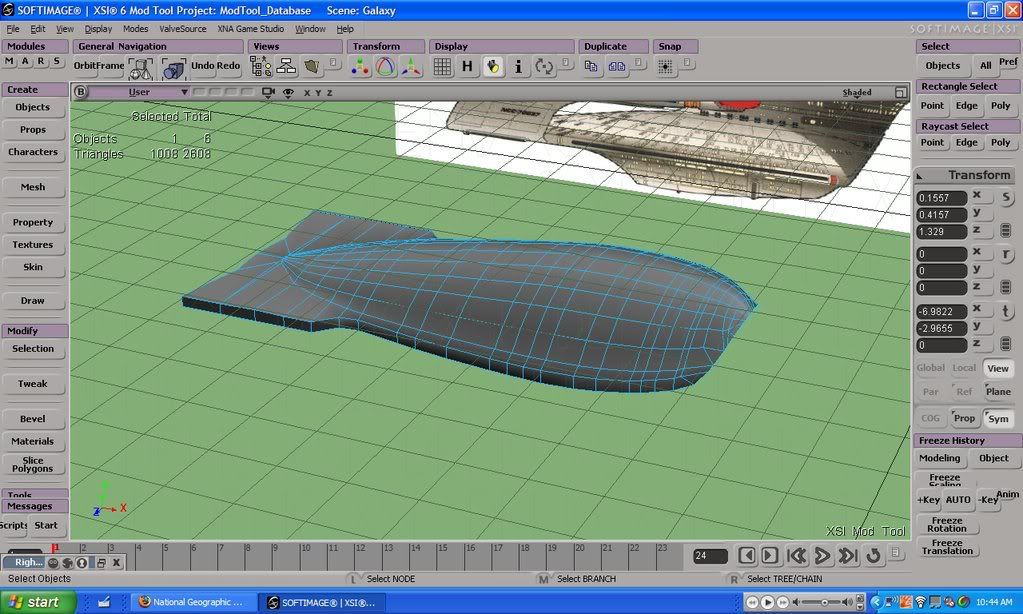
I then repeat this process until I have a smooth almond shape following the contours shown in each of the rotoscopes.

I then repeat the process for the bottom, but I don't translate the first layer down, so I can achieve the sudden drop that appears on the underside of the saucer.

When I'm done with the bottom, the rough saucer section looks like this.

The next section I model is the engineering hull, first making a cube.
I then again use this cube to form a thin slice of the engineering hull

Then, as before, I duplicate, translate, and scale the polygons on either side, occasionally moving individual points to maintain the outline of the hull. The end product looks something like this.
As you can see, I have selected and deleted polygons on either side to make room for sections that I could not easily model by simply duplicating and manipulating slices, and then repositioned the individual points on the edge to make a smooth curve to which I attach a plane.

To attach a plane object, I first create a plane and then select both the hull and the plane object, and select Mesh>Merge Meshes. Then opening the ModExplorer with 8, I select the newly created object polymsh and select the option Polygon Mesh> Merge Meshes. Turning the tolerance down to zero will allow the polymesh to retain all of the qualities of the original two objects. I then choose the Delete Input Operators option to get rid of the original objects.
Now that the plane and the hull are one object, I can use the tweak tool to weld the outer points of the plane to the hull. When using the weld function, you can click and drag points on top of others to merge the two into one point. Once the plane is completely connected to the hull, I adjust the position of individual points and use the duplicate>scale/translate polygon method to achieve the look I desire.

I then use various combinations of these techniques to form the other parts of the model, and come up with a result looking like this

Then, using the technique described, I merge the objects into one polymesh. This forms one object we can manipulate and makes it much easier for us to texture, scale, and rotate the model in preparation of exporting into the game.
To learn how to create and apply textures, as well as import your model in game, stay tuned for my next update!
Ezraeil
Ok, first thing comes first. If you are planning on modelling a ship that has already been created before, i.e. from your favorite show or movie, I highly suggest gathering resources for the modelling process. For this tutorial, I decided to model the Galaxy Class Starship from ST:TNG. I searched the internet and my favorite databases and found several good blueprints/schematics as well as reference photos.
Once you have these, you're ready to go into Modtool and start making your model. Now, I'm going to assume that some of you have never opened mod tool before and have no idea what you are looking at, so I will take you on a walk around the screen.
1) this is where most of the actual creation begins. Use this button to bring up the object creation panel, allowing you to create basic shapes and curves.
2) useful for merging objects into one mesh.
3) used to apply textures and texture projections to your model.
4) used for exactly what you would expect, tweaking your models. the weld points function is especially useful.
5) these are buttons I've added myself to the toolbar so I don't have to go searching through menus and what-not to get the function I want. To add a button, right click on a blank portion of the toolbar and click the add button function. You can then drag names of functions from the list directly to the toolbar to add a button for them. I would suggest adding a button for beveling, slicing polygons, freezing scaling, freezing rotation, and freezing translation.
6) When manipulating a point/polygon/edge in your object, if this option is selected, it's counterpart on the opposite side of the axis will move also. You can adjust this (i.e. change the axis that the symmetry is mirrored across) by right clicking on the button.
7) This button adjusts whether or not the changes you are making are taking place from the center of gravity of your current selection.
8)similar to the COG option, adjusts the reference from which the changes are made.
9)the translate tool this repositions your selection in space. By clicking on the individual axis on the right panel, you can manipulate the position of your object in just one axis. To select more than one, just hold Ctrl while clicking on the Axises of your choice! to select all three quickly, click the little button in the lower right hand corner that looks like a pill. This ability to select individual axis applies to Scaling and Rotation too, just in thier respective panels.
*The hot key for this is V
10) Rotation tool, similar to translation, but rotates in the three axis instead.
*The hot key for this is C
11) Scaling tool. Again similar to rotation and translation, except it changes the size of your selection.
*The hot key for this is X
12) These are the buttons used for selecting the different components of your model. Raycast select uses a paintbrush method of selection, and only selects components not obscured by other components (i.e. if you have two planes, one right in front of the other, you can only select components of the plane closest to you.) Rectangle select selects using a selection box and will select all components contained in the selection box, whether or not they are obstructed.
>>Side note!
Forgot to mention the button directly above 13, the Objects select button. this allows you to select entire polymeshes by simply clicking on them
*hot key for this is Spacebar
13) these buttons exist in each of your view windows, and when clicked will full screen that view. Useful when you are working with fine details.
14) The Orbit button. This is how you navigate in the view screens. when selected, you can pan in a view screen by clicking and dragging with the left mouse button, zooming by clicking and dragging with the middle mouse button, and orbiting by clicking and dragging with the right mouse button.
*The hot key for this is S
I believe this is all the basic buttons you need to know to begin modeling, but I may come back and add more definitions as people request or as I see fit.
One important thing that will greatly speed up your modeling is LEARN THE HOT KEYS! They are quite awesome and and have this stacking ability, so if you press a hot key to activate something, you can press it again to return to the previous function without having to select that function again. Also, if you hold down a hot key, the function of that key will only stay active as long as you hold it. Useful if you want to simply pan/change angles in a screen, you can hold down S, change views, and release, and you're back to the function you had before!
The techniques I am about to show you are in no way the only techniques to use, and many people would recommend others in place of these. The best way to model is to develop your own technique by using someone else's as a base, and customizing it with your own tricks and techniques you develop as you gain more experience.
That being said, here is how I make my models!
The first thing you will want to do if you have managed to gather some good profile shots of your subject is to rotoscope them into your separate views.
To do this, right click on the box directly to the left of the minimize/maximize button and go down to the rotoscope option. That will bring up a menu like this.
To add your picture, go to the NEW button, and select New from file. then find the path to your image and it should now be added to the image resources of your scene. You can now adjust the scale and posistion of the image to fit your needs. Make sure the Image Placement setting is set to Fixed, otherwise, the rotoscope will be of no benefit to you. You can also select Show in All Views to make your image appear in the 3d viewscreen. I find this very helpful, especially at the begining, but others may not find it as helpful. You can then repeat this process for the other two viewscreens and with a little adjusting of size and position of each object, should get something like this.
Once you have this you can move the images out of the way so they do not interfere with your view of the 3d workspace or you can leave them as they are, that is your own personal preference.
Now that you have pictures rotoscoped, you can now move on to the creation of the polymesh. You will want to mentally divide your model into somewhat symmetrical or inclusive parts to begin modeling. I chose to divide the Galaxy into the Saucer, Engineering Hull, and Warp Nacelles.
Once you have selected an area to model, create a primitive (object [button #1 on list]) that seems most appropriate for the section at hand. Because it was pretty obvious, and because of the technique I most employ, I chose a cylinder for the saucer section.
Once you have created a primitive, a menu should appear allowing you to adjust the various geometric aspects of your newly created object. This menu can be accessed at any time by selecting the primitive you want to modify and pressing Enter. The important things to adjust now are under geometry, and define how complex your final object will be. The proportions of your primitive (Radius and Hight in this case) are not as important as we will be changing them quite a bit in the near future.
You will also notice that I have positioned the cylinder over the saucer and have used the x and z scaling to match the cylinder to the saucer section of the Galaxy. Not visible in the above shot is that I have also reduced the size of the cylinder in the y axis so it is no more than a thin slice.
Here's where the real work begins. First I select all the polygons on top and then using Ctrl + D, I duplicate them, thereby making exact replicas of the original polygons on top and connected to the originals. I then use Translate and Scale to reposition this layer and effectively make a new "Slice" of the saucer.
I then repeat this process until I have a smooth almond shape following the contours shown in each of the rotoscopes.
I then repeat the process for the bottom, but I don't translate the first layer down, so I can achieve the sudden drop that appears on the underside of the saucer.
When I'm done with the bottom, the rough saucer section looks like this.
The next section I model is the engineering hull, first making a cube.
I then again use this cube to form a thin slice of the engineering hull
Then, as before, I duplicate, translate, and scale the polygons on either side, occasionally moving individual points to maintain the outline of the hull. The end product looks something like this.
As you can see, I have selected and deleted polygons on either side to make room for sections that I could not easily model by simply duplicating and manipulating slices, and then repositioned the individual points on the edge to make a smooth curve to which I attach a plane.
To attach a plane object, I first create a plane and then select both the hull and the plane object, and select Mesh>Merge Meshes. Then opening the ModExplorer with 8, I select the newly created object polymsh and select the option Polygon Mesh> Merge Meshes. Turning the tolerance down to zero will allow the polymesh to retain all of the qualities of the original two objects. I then choose the Delete Input Operators option to get rid of the original objects.
Now that the plane and the hull are one object, I can use the tweak tool to weld the outer points of the plane to the hull. When using the weld function, you can click and drag points on top of others to merge the two into one point. Once the plane is completely connected to the hull, I adjust the position of individual points and use the duplicate>scale/translate polygon method to achieve the look I desire.
I then use various combinations of these techniques to form the other parts of the model, and come up with a result looking like this
Then, using the technique described, I merge the objects into one polymesh.
This forms one object we can manipulate and makes it much easier for us to texture, scale, and rotate the model in preparation of exporting into the game.To learn how to create and apply textures, as well as import your model in game, stay tuned for my next update!
Ezraeil


