Now for the next segment ...
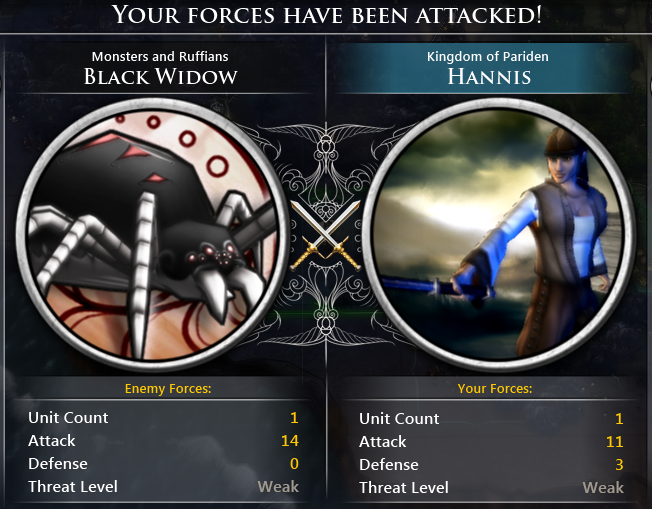
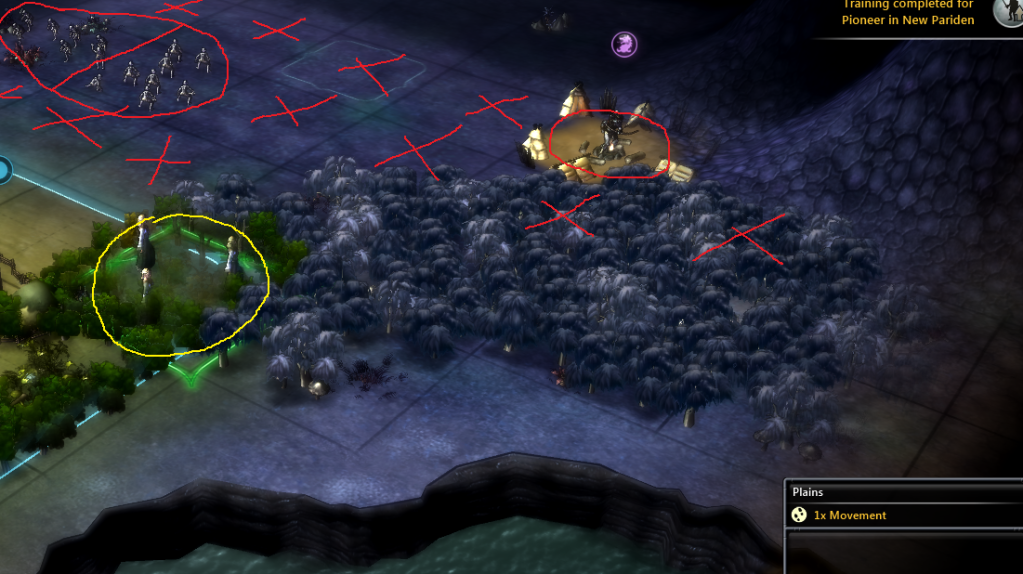
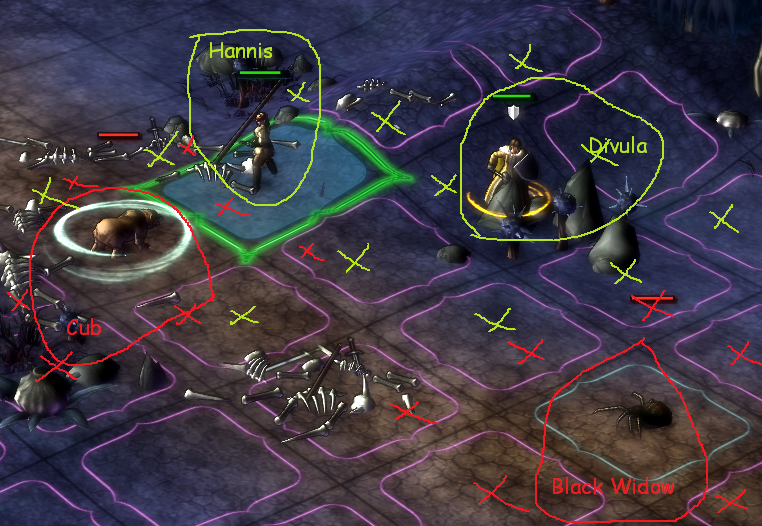
As I was moving Hannis back toward New Pariden to acquire Divula's armor, the Logging camp completed in the forest south of New Pariden, which caused the border to expand to encompass the Bear Cub. This caused the bear cub to wander away, leaving behind the Signs of the Bear treasure, so I moved Hannis toward it. This required trying to skirt past a few monsters, including the Black Widow, but the Black Widow attacked.

Unfortunately, Hannis has no tactical spells (and even if she did, her Ironeer blood would make them expensive manawise) nor skills, and her Initiative is low. The Black Widow, in fact, got the first move, which was a failed attempted Web. In 3 more rounds, the Black Widow would get a double turn. Unfortunately, this does not look like it will go well ...
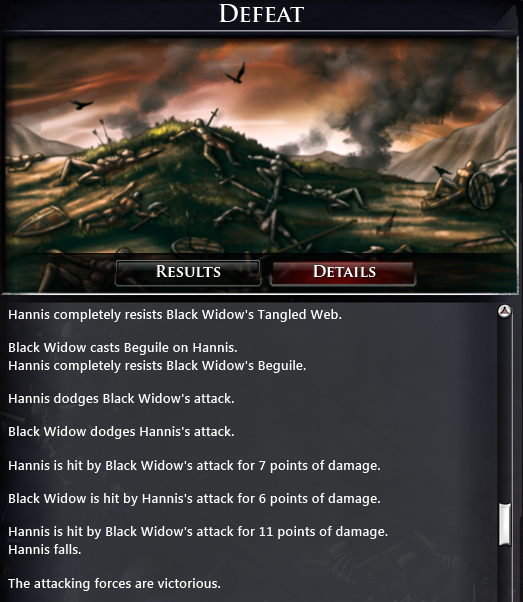
The next round, the Black Widow attempts to Beguile, which also fails. I then advance to one tile between the Black Widow and Hannis. The Black Widow closes that one tile gap and attacks, but Hannis manages to dodge. Phew, one attack round survived! However, Hannis' turn after this one will be followed by two back-to-back attacks by the Black Widow.
Hannis' attack on the Black Widow results in a dodge.
The Black Widow's next attack does 7 damage, leaving Hannis with 11/19 HP -- almost half gone -- and poisoned. I now only have the current attack between Hannis and a double attack from the Black Widow, likely fatal.
The Black Widow takes all of 6 points of damage from my futile attack, and does not even need the second of its double-attack the next round to kill off Hannis, wiping her out with an 11-point attack.

Hannis receives the 'Blind In One Eye' injury as a result of the fall, giving her a -25% to Accuracy. Using her power of escape costs 5 Mana, and it will take her 5 turns to recover (so now my Sovereign will recover first). A bummer all around, to be sure.
Divula has recovered, however, which is really good given my first Pioneer is nearly finished. Divula is back in the game with 6 of 16 health, so I'm going to keep her away from monsters until she heals. I send her to collect the Signs of the Bear treasure, which turns out to be a Leather Cuirass (2 Defense). For now, I'm keeping her Rusty Cuirass (4 defense), but will likely give that to Hannis when she recovers and just use the Leather on Divula.
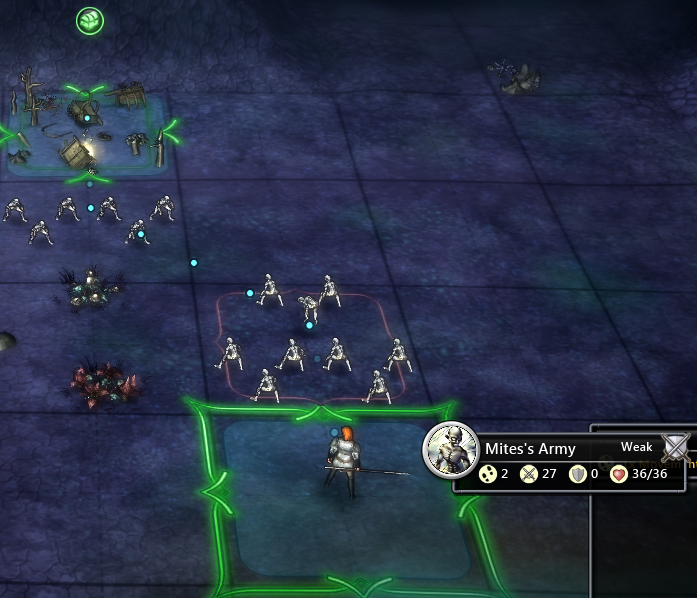
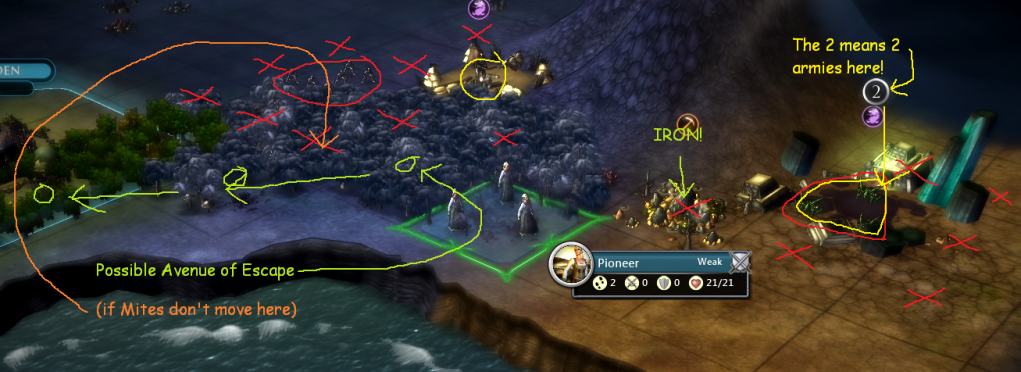
Unfortunately, attempting to return North, I run into a sizable Mites army ... usually not a threat, but with such little health on Divula, I am concerned.
Indeed, they attack next turn, with Divula having only recovered a single health point to 7 / 16.
There are three stacks of Mite groups with 3 each in them (and if that isn't enough threes, each Mite has an attack of 3!). Two of the Mite groups have a total of 12 HP, the third has 15. I have only 17 Mana, but I do have Divula's Slow spell which only costs 5. Facing all 3 will be exceptionally dangerous ... I seem to have nearly double the Mites' Initiative, as each Mites group gets an attack after my opening move, then Divula gets -two- attacks, then one from each of the Mites groups again, then two more from Divula. That's my best hope at this point, and I can make it even better by Slowing them -- with 17 Mana, I have enough to slow each if I can 'kite' them -- move away from the Mites groups as far as I can in a combat round, cast Slow (going to start with the 15-HP group first), rinse lather and repeat. With luck, I will have at least two Mites groups slowed before any of them get to attack, and then I can face one at a time. Without any Heal potions or spells, though, this will still be a tough fight with only 7 HP. 3 Mites x 3 attack/each versus my four defense ... I still am not confident about how defense works versus attack, but if each group of 3 can only do 3 total damage, against my Defense, that is still a lot of damage.
I realize now I should have grabbed Hannis' Helm while she recuperates, that would give Divula an extra defense, but it is a bit late for this fight.
Failure! The first attempted +Slow on the 15-HP Mites group is Resisted.
And does so again. Now down to 7 HP, only enough Mana for one more attempted +Slow.
And resisted a third time ... rats! 15 mana wasted to no effect. I no longer have enough Mana left for another attempt ... so I do the best I can. My attack results in a Dodge; each of the Mites groups lands an attack, each at one point of damage total, leaving me with 4 HP.
The next round is almost an exact repeat -- my two attacks result in complete Dodges; two Mites groups do 1 point of damage each, but the third manages to get 2 points of damage which kills Divula.
1 of my remaining mana is used to escape, and it will be five turns again to recuperate Divula.
11 seasons in, I have 1 mana (still at +4/season), 62 Gilden (still at -0.2/season). My Pioneers finish, but with my champion and sovereign out of commission, I cannot safely escort them anywhere even if I had a settleable site. I decide, however, to use them for what I call "fraidy scouting" -- keeping at least one tile between them and any monsters they find, being very careful against rushing into areas covered by the fog-of-war. Monsters can only move 1 tile/turn even on Plains, so so long as there is at least 1 tile between my unarmed Pioneers and a monster, they are safe -- but if I am not careful, they can get trapped and surrounded.
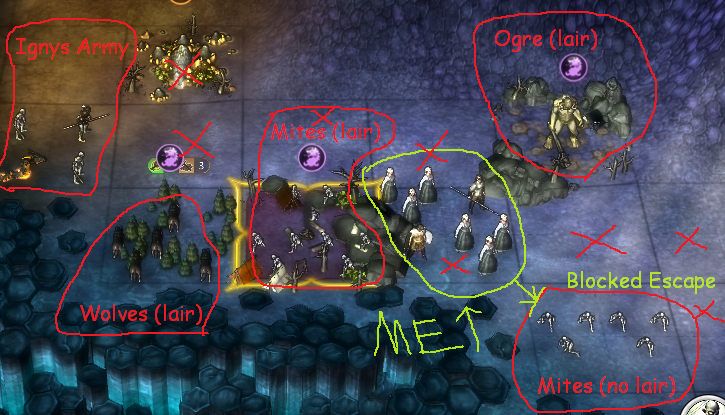
As can be seen in the screenshot, this is severely limits movement; there is no safe path between the Darkling warrior in his camp and those maurading Mites. The only safe route to explore is along the cliff-coast to the east.
Hopefully, my exploration will bear fruit ...
I find an Iron Ore, which is good (well, better than finding a dragon!).
The Mites attempt to follow, which is frustrating ... and trudging through the forest toward the Iron Ore reveals a trio of Air Shrills past it, but there is space enough for my Pioneer to continue south of them immediately on the cliff coast if they stay in their home (if they are in one of the Purple-marked areas, like the Darkling in his camp, they usually don't move).
The Mites continue to follow, and the Air Shrills camp suddenly get a second army -- two 3-group Rock Spiderlings (you can click on an enemy on the strategic map to view them; if a second army is present, you can click again on the tile to view the second army), which is dangerous -- a new army from a monster's home will often roam and hunt for hapless units. Word of advice: don't feed Pioneers to Shrills.  Psst, that's a secret tip, don't go telling everyone!
I'm really not liking this, with the Mites continuing to follow. I decide to head my Pioneers back to town, but its roughly the same direction as the Mites. If the Mites move diagonally Southeast, the avenue of escape is cut off and my Pioneers might be completely doomed. Remember when I said 'Dense' monsters has a drawback, despite being useful for Beastlord? This would be a problem ... but, I'm going to "Ironman" this game for the sake of you new guys which, I confess, I typically don't do. Do or die ...
Quite unexpectedly, the Mites move diagnoally NORTHeast, into the Darkling camp. Phew! The Rock Spiderlings, however, move southwest, which puts them adjacent to my Pioneers and no safe passage east, so I have no choice but to retreat my Pioneers back toward New Pariden.
I did not pay attention as the Mites move southeast from the Darkling camp, and I move my Pioneers due West due to not noticing this, which puts them adjacent to the Mites at the end of a turn. D'oh! Fortunately, Hannis recovers this very turn (Season 15) and I move her in in the hopes she might offer some protection, but she only has 6 HP.
The Mites send me a 'greeting' in the form of a message: 'It has shinies. Maybe we can take the shinies from it.' Monsters often say such things when you end a turn adjacent to them, but does not necessarily mean they will immediately attack ... sometimes they give a grace turn ...
Restoration completes researching, enabling Workshops (+1 production/Material) and Gardens (+15 Food/Grain) before I find out whether the Mites will attack this turn or not.
And ... phew, they do not attack! The Mites move back to the Darkling camp, so now I can continue West with Hannis and the Pioneers.
Divula, too, has now recovered, and the second Pioneers have completed. Only the Scrying pool now remains in New Pariden's build queue, and to the end of it I add a workshop, a Merchant (will reverse my slight deficit to a surplus) and a garden (with only 2 food, New Pariden is already at its population limit of 40 / 50 needed to reach level 2).
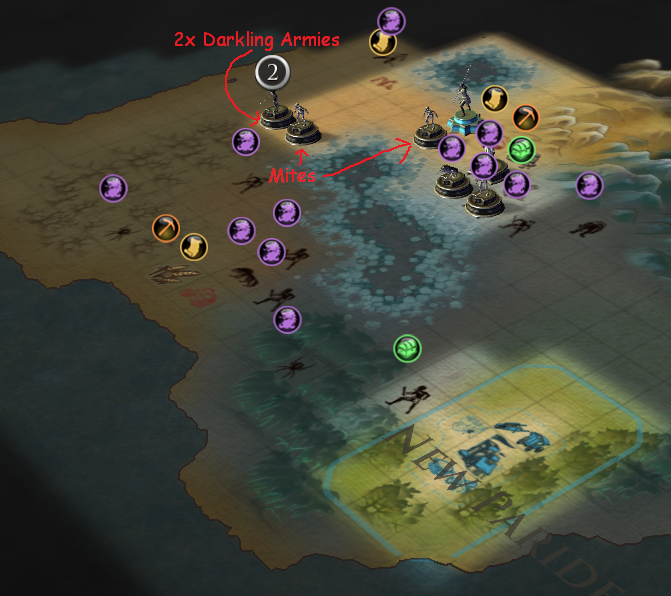
I move the second group of Pioneers and Divula in with Hannis and her Pioneers for one big Pioneer stack to go exploring to the northwest. I will continue to try to dodge monsters for now, as both Divula and Hannis need to recuperate HP. The Spiderlings are left behind, and I am able to get to one single tile between my Sovereign's stack and the abandoned caravan to the northwest; the Mites army is still at the Darkling camp, one tile between us; next to New Pariden is that bear cub hanging out over a Darkling camp with a Darkling Shaman as a second enemy there. It is right next to New Pariden, but neither are much of a threat to my town just yet with just the standard defenders, so onward I go to the Abandoned Caravan, seeking treasure and scouting for a second (and hopefully third) city site ...
The Mites meander northwest. The Abandoned Caravan bears a Lucky Skullcap which has 1 Defense and provides +5 to Dodge and +1 to Crit Chance. I swap it to Hannis, and equip her simple Leather Cap on Divula as Hannis needs to be my heavy hitter while I focus on spells (and Taming) for Divula. I also remember to swap Divula's Rusty Cuirass to Hannis, and equip the Leather Cuirass on Divula. This leaves Divula with a meager 3 defense, but Hannis with 7 and both are only slightly past their halfway encumberance (the more encumbered someone is, the lower their initiative -- but Hannis has a -4 penalty to initiative due to her Battle Hammer).
The mountain by the iron mountain and Darkling camp forms a bit of a corner, heading north forming a corner with a couple woods and a Warg monster (wargs are decent fighters to tame, better than lone wolves for their HP and attack ... but its going to take me a long time to recover enough mana to cast Tame again, and my first priority will still be a web-casting Spider, probably that Black Widow that has defeated each of Divula and Hannis), then continues due west, completely blocking off northern movement as revealed by reaching the Abandoned Caravan. There is still a narrow, two-tile-wide unexplored path to the far northwest between that mountain range and the chasm, but it is blocked by an occupied Ogre camp and a Darkling camp, and there's no assurance there are any accessible tiles past it ... still, I head there. I can probably handle the Darkling, if needbe ...
I head there, to a tile that is adjacent only to the Darkling (don't want to mess with an Ogre just yet!). It reveals the narrow pathway opens up, but unfortunately it is tightly packed with monster camps: Mites (3x4-groups), Wolves (1x3-group plus two single wolves), and a single butcherman. There is also a Shattered Statue goodie site, but its under another Mite army (two 3-groups).
At this point, Divula only has half her HP recovered (8/16), and Hannis half of hers (9/18), so even against a weak Darkling, I'm not quite ready to commit.
I decide to head back toward New Pariden and aim to challenge the Bear cub (It can be nice, but not great, and I won't have enough Mana, so I'm just going to take it out) and the Wilding Hermit.
After closing half the gap between myself and that Wilding camp, the bear cub (having co-occupied the camp for several turns) moves off and toward New Pariden, oddly. I'll let it go if it just wanders off, but I am going after that Wilding camp ...
Wilding Shaman have an ability called Stones which, upon start of combat (not counting as a turn) automatically hits all of its adversary's units doing a certain amount of damage. This knocks Divula down to a single health point, Hannis to 18, and of course hits my Pioneers, too. I cast Slow successfully on the Shaman and move Divula and Hannis in to the Shaman. If Divula falls but Hannis survives and the fight is won, Divula gets no XP but will not get an injury (since she is the Sovereign) and will not have to spend 5 turns recovering nor spend mana escaping to safety.
Hannis is able to get in for a first strike ... with a 57% chance to hit with 3-7 damage versus 17 hit points ... she lands a blow doing 7 points of damage. The Shaman does 'Clink' damage on his turn (I believe that means less than 1, but not fully zero). Then Divula does another 7 points of damage, putting the Shaman down to 3 ... I might just win this! The shaman gets another attack in on my Sovereign, falling her, but Hannis then finishes him off with 6 points fo damage.
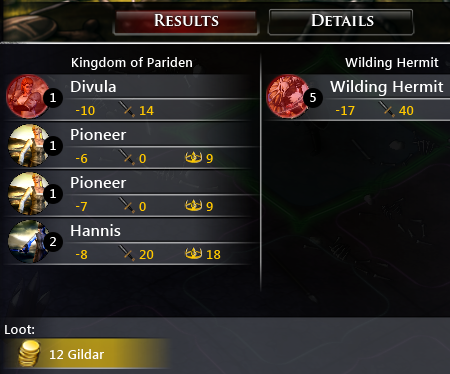
The victory does gain me 12 Gildar, and ... I will get to loot the Wilding camp!
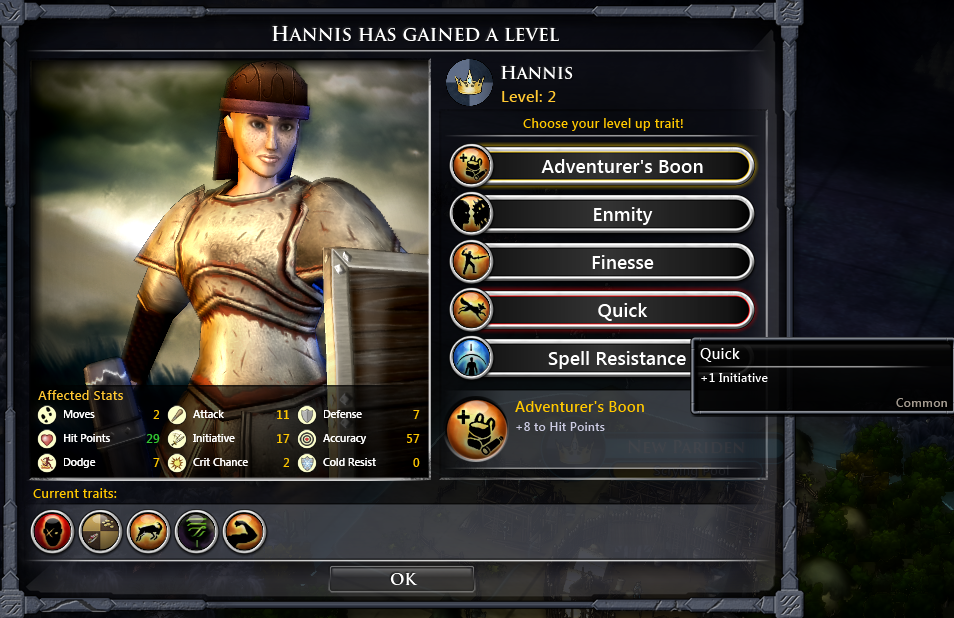
The XP does net a level up for Hannis, with the following bonus traits to choose from:
- Adventurer's Boon (+8 maximum hit points)
- Enmity (+25% bonus attack versus Empire [enemy AI civ units, but not monsters/animals/etc])
- Finesse (+3 attack bonus vs. units with a lower initiative [obviously she's not having a surplus of Initiative herself though])
- Quick (+1 Initiative)
- Spell Resistance I (+10 Spell Resistance)
Adventurer's Boon and Quick stand out as the best options; Hannis really needs higher initiative, but we are not doing well HPwise, so I opt for the Adventurer's Boon. This ends my turn, but after hitting End Turn, before I can loot the camp, that Black Widow occupies the camp. Fine, then! I'll go loot the Widow Lair!
Unfortunately, the Black Widow and the Bear Cub both chase me down. New Pariden's Scrying pool completes, and I use the one Essence it provides for Meditation (+1 mana/essence ... seems like a waste as I only have one essence and thus one mana as a result, but I am kinda hard-up for Mana). At this point (Season 22), my Mana has recovered to 40 and with the Meditation city enchantment, my Mana is now increasing at +5/season.
I do not want to risk an encounter with the Black Widow just yet, as Divula and Hannis are both very low on HP. I decide to continue West, letting the Black Widow and Bear Cub cut me off from New Pariden. I let myself end turns adjacent to a Black Widow farther west in its lair and a wandering army of three individual wolves as they aren't very high HP themselves (only 11 total HP between 3 wolves).
Unfortunately, there is a sizable meandering army of Darklings which inhibits my movement northwest, so I zip around the Black Widow in her lair (this one hasn't been perturbed yet by a failed Tame attempt, so probably won't move). Slowly, carefully, I continue scouting West, trying to stay away from the Darklings (kind of embarrassing, they are pretty weak, but with my low HP they are a threat). The Wolf's Army skirts around me but does not attack despite being adjacent to my army several times. It does not take too much longer to discover that southern cliff-shore turns northward a short ways past that Wild Grain food resource. Two meandering Darkling armies and a Mite army continue to close in, but by season 31, Divula is up to 15/16 HP and Hannis at 25/29. Its time to kick them over for some XP!
I let the Darklings initiate the attack. With a 50% Resist chance, and my mana up to 90, I attempt to cast +Slow after moving on the highest-HP of the three darkling 3-groups (15 HP versus the other two 3-groups at 9). While that isn't a lot of HP, all three 3-groups have 3x6-attack each, which can really hurt. The +Slow is Resisted -again- (how many times in a row did they resist in the previous fight?)
The 15-HP group is able to get in and attack, after the failed Slow, for 5 points of damage versus Divula. With Hannis and her Adventurer's Boon HP boost, I decide to tank her versus the two other groups, putting her in reach of both; the AI will not move their units away from yours when adjacent, except to attempt to retreat if their units are ranged or very low on HP; this means Divula only faces the 15-HP group.
Unfortunately, Hannis' attack is dodged.
With a 76% chance to hit for 3-7 damage, Divula manages to do 4 points of damage to the 15-HP group of Darklings; not enough to kill one, unfortunately.
The 15-HP group of darklings gets the next strike attempt in versus Divula, but Divula manages to dodge.
The two other Darkling 3-groups do 4 points of damage collectively to Hannis, then with a 57% chance to do 5-11 points of damage, Hannis' attack is again dodged (jeez, didn't she have the same rotten luck her last fight versus Mites?). The 15-HP Darkling group attempts to hit Divula again, but she dodges again; unfortunately her attempt to strike them results in a Dodge as well.
The 15-HP Darkling group manages another 5 point hit on Divula, knocking her down to 6 HP.
Hannis takes a little more damage, but I move her over to take on the 15-HP group endangering Divula and Hannis, at long last, manages to get in a hit for 6 points of damage which kills two of the three Darklings in the group, leaving just one (so it can only do 6 points of damage instead of 3x6!).
I move Divula to the far side of the originally-15-HP Darklings 'group' (now down to just a single Darkling with 5 HP) to make it difficult for the two 6x3-attack, still full-HP 9-HP groups of Darklings to get to her as they would get blocked by Hannis; it would take more than one round for them to go around, which would leave plenty of time for Hannis to intercept and attack them.
Divula does 3 more points of damage to the originally-15-HP Darkling group (not really a group anymore!), knocking it down to 2 HP. With her defense, she should be able to survive anything but a critical strike back from the last Darkling standing in that group.
For some reason, it tries attacking Hannis again, but results in a dodge; the 9-HP group that was already adjacent to her does a little more damage, but the third tries skirting around without attacking, possibly trying to get to my Pioneers I have hiding out above what I cropped on that screenshot, but my Pioneers can kite away from them thanks to Hannis and Divula blocking. At this point, Hannis is down to 17/29 HP, much better off than Divula. I prioritize the 9-HP group adjacent to her, as that is 6x3 damage coming at her versus the last Darkling standing in the 15-HP group, and I don't want to move her off to face dual attacks from the other 9-HP group chasing my Pioneers just yet, so I set her to attack the 9-HP group hoping to knock them down, and ... no go; they dodge again.
They attack back and manage to knock Hannis prone, so she loses her next attack.
Divula gets another attack, and finishes off that last Darkling standing from the originally-15 HP group. Aha! I keep her out of the fight for now, though, against the two still full-HP 9-HP Darkling groups with Divula's 6 remaining HP. Instead, I leave her where she was and attempt to cast Slow on the 9-HP group that is trying to chase the Pioneers with success, which seems to let Divula and Hannis have two rounds to each of that group's one.
Hannis recovers, then its Divula's turn again ... I attempt a slow on the Darkling group adjacent to Hannis. Success! Both Darkling gorups now +slowed.
Hannis' attempted attacks result in Dodges for several more rounds, unfortunately the Darklings' attacks do not and they whittle her down to 6/29 HP. Fortunately, her next attack does land and completely destroys one of the 9-HP groups, leaving just a single group. With equal HP, there's no longer an advantage to hiding Divula away from the remaining group, so I move her in to attack ... she only does 3 damage, but since the total 3-group of Darklings have 9 HP collectively, that's enough to cause one of the 3-group to fall, so now they are down to 2x6-attack.
She gets another round, as does Hannis, before the +Slowed Darklings, and Divula's next attack finishes off the Darkling group.
Divula and Hannis each get 5 XP, the Pioneers get 2 (pah! lol), and we loot 6 gildar (at a deficit of 0.2 gildar/turn, that's 30 turns of deficit paid for!).

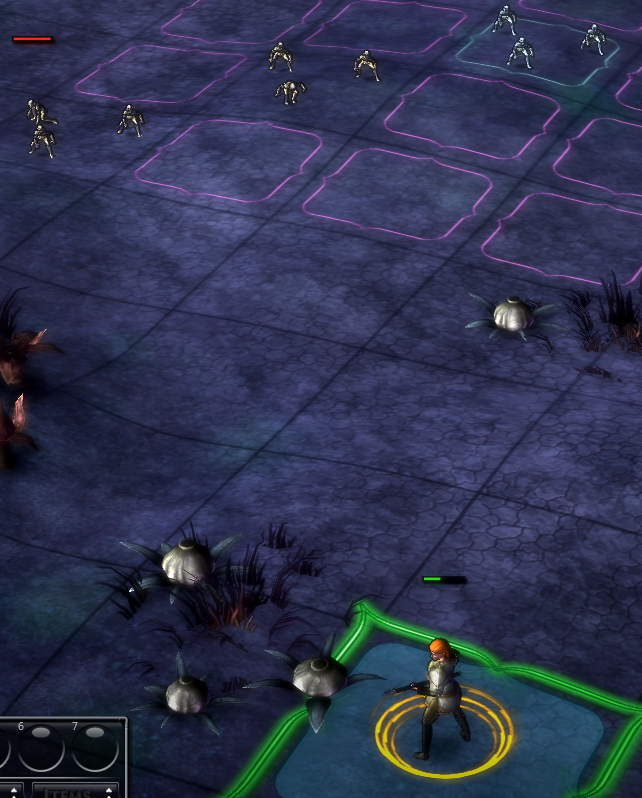
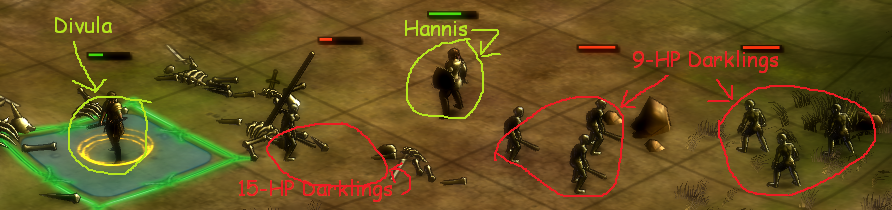
Unfortunately, while it was a victory, it leaves my army low on HP ... fortunately, the Mites and second Darkling groups do not immediately attack, but my army is caught between them with almost nowhere I can run. I could run them two squares diagonally southwest to a tile that is not adjacent to either of the enemy armies, but it would be trapped there the next turn by the southern Darkling Warrior's Army and unable to get to a non-adjacent square the following turn. The Woods to the east inhibit movement, so I can only move through them 1 tile at a time myself.
An important question then arises which army is the worst to face in my army's low-HP state.
The Darkling army to the south consists of a Darkling Warrior with 5 HP, 3 attack and 0 defense and three 4-groups of Darklings, each group totalling 12 HP (not a lot, only 4 HP each) but 24 attack (ouch! That would be 6 attack for each of the 4).
The Mites army to the north consists of three 3-groups of Mites with 9 attack collectively (only 3 attack each); one of the 3 groups has 18 collective HP (6 apiece) while the other two have twelve (4 HP for each).
It seems clear the Mites army is less of a menace, as they have a lot lower damage potential, so I move my army one tile north-east so it will be adjacent only to the Mites army.
The Mites do not attack next turn. A second Mites army identical to the first (3x3 attack, 1x18 HP group + 2x12 HP) is revealed to the north as well. I continue through the woods north-east, away from the shore to avoid getting trapped and pinscered. I zig and zag a bit to avoid being pinscered by the two Mites armies, and that Darkling army continues to follow behind, but another move north (this time northwest to the northwesternmost corner of those Woods) reveals a second Darkling army to the north, identical in composition to the first (1 warrior with 3 attack and 5 HP, plus three 4-groups with 6 attack and 3 HP each).
At this point though, I have more options thanks to being on the edge of the plains. Unfortunately, the Darkling armies smell blood at try to pinscer me in, and the Mites army while not attacking, does block me from one avenue of escape through the plains, so to avoid being menaced by the two Darkling armies, I retreat a bit eastward through the woods.
Unfortunately, despite this exploration, no settleable site has been found for my Pioneers.
The two Darkling armies close in to the west of me, but the Mites are unable to keep me contained, so I manage to spring away into the plains farther north. I now have that chasm fully scouted around, reveal an Ancient Ruins (Deadly quest location), another Butcherman in a hold, and meandering Ignys army (I am definitely way to oweak for them). Two tiles north of that chasm is the start of what appears to be another chasm.
I move away from the Darklings and continue North. I could probably tackle the Butcherman, or even the Mites armies, but I am also getting desperate for city settlement sites, and there are absolutely none I have found yet, plus I would like more time to recover my army's HP.
Unfortunately, proceeding north in the 1-tile-wide plains between the northern chasm and the mountains, I find a tight corner with an occupied Ignys lair right in the corner. They usually do not attack if not perturbed, but sometimes will, and I definitely cannot risk them attacking, so I retreat back south.
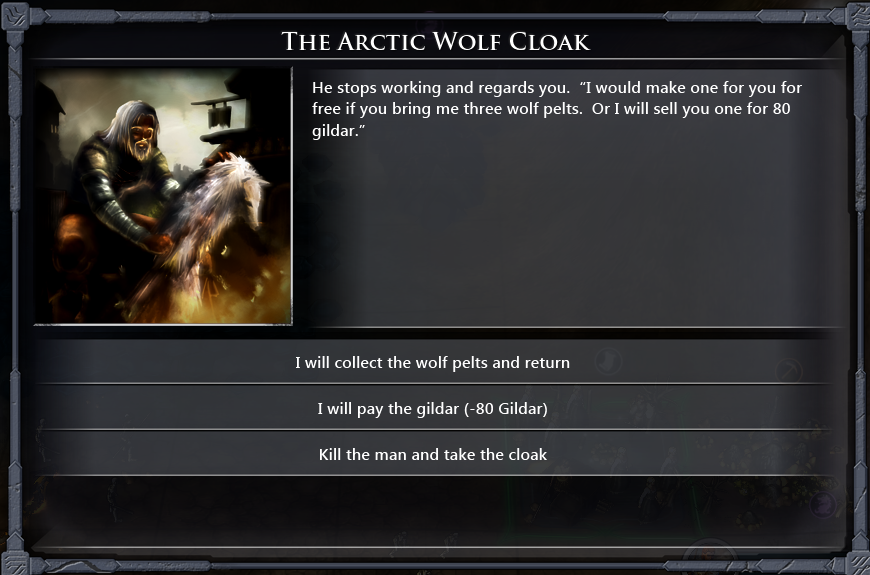
I decide to move to that Hut with a weak quest to the southeast, which gives me 'The Arctic Wolf Cloak' quest: I can go kill enough wolves to collecte 3 pelts, or pay 80 gildar to buy the cloak instead. I do have 81 gildar, and my Merchant completed in New Pariden (changing my 0.2 Gildar deficit/season into a 0.6 gildar/season surplus!), so I can -- just barely -- afford it. Between my low HP and dis-inclination to kill animals (I don't believe I can collect wolf pelts by Taming wolves -- logically, I shouldn't, since skinning a wolf for its pelt generally kills it, though I am not 100% certain gamewise -- I should probably investigate the possibility of such a bug in the future).
Cloaks such as this are nice, in that they do not take up a normal armor slot, but can only be worn over certain kinds of armor. The Arctic Wolf Cloak provides 1 defense plus 25% cold resistance. Since Divula desperately needs more defense for now, with Darklings, I give her the cloak for now.
New Pariden finishes the Garden (the last building in its queue), so I add a Monument (which will increase its Zone of Control -- its borders) and a Cleric (decreases unrest).
The game thus far is not going well -- I should have at least one, preferably two city expansions by now, but my explorations are blocked. I decide to go after the Butcherman to loot his place, as he's only one guy with 10 HP, I can then get the Shattered Statue loot behind him, too. Hopefully I'll find more defense for Divula or Hannis, or possibly better weapons. Disturbingly, the roamin Ignys army seems to be chasing me, now -- I definitely cannot face them just yet.
I manage to +Slow the Butcherman on the first attempt; unfortunately, Divula reaches him first (carefully avoiding letting the Butcherman getting the first hit by moving to a tile one tile-span away from the Butcherman's movement limit; this doesn't always work as the AI is sometimes smart enough to not fall for this trap) and attacks, but her Clumsy kicks in and she swings at Hannis instead; fortunately, Hannis dodges.
Hannis moves so she is not longer adjacent to Divula, but adjacent to the Butcherman and manages to hit for 3 points of damage. The Butcherman counterattacks her attack, but Hannis dodges; the Butcherman then gets his own move and attempts to attack Hannis, but she dodges that, too.
Divula then gets an attack and manages a further 6 points of damage, bringing the Butcherman down to 3 / 12 HP. The Butcherman gets another attack and attempts to hit Hannis, but she again dodges (woohoo!).
Hannis then gets to move, but The Butcherman dodges her attack; he counterattacks the attack and manages to do 4 points of damage that time.
Divula manages to finish off the Butcherman, though, gaining 3 XP apiece to her and Hannis, and 3 Gildar.
The loot from the Butcherman's hangout is a Guiding Spear which is identical in stats to Divula's Regular spear (7 attack, Ignores 50% of victim's defense, Immune to Counterattack) but also has +10 accuracy. I decide to equip Hannis with this spear, to compensate a bit for her Accuracy-nerfing injury, and give her Battle Hammer to Divula. The Hammer's -4 Initiative penalty means I should probably swap it out for the regular Spear (which has no initiative penalty) if I want to try to Tame two or more animals, but its higher damage could be useful in the hands of Divula who does not have Hannis' accuracy penalty.
With this equipment exchange, Hannis can no longer wield the shield due to her spear being two-handed, so I equip Divula with the shield. Unfortunately, this does put Divula very close to her encumberance limit, so I expect this will impede her initiative even more than the hammer already does.
Checking the details (you can check a sovereign or champion's details by clicking on their round portrait when you have them selected in an Army), Divula's attack is now 11, her defense 6, Hit Points 16, Initiative is now 15, Accuracy 76, Dodge 2, Crit Chance 1, Spell Resist 1, Spell Mastery 73; Hannis' stats are Attack 7, Defense 5, Hit Points 29, Initiative 23, Accuracy 66, Dodge 5, Crit Chance 2, Spell Resist 32, Spell Mastery 72 (but she has no tactical spells yet).
The statue treasure yields me a Nectar potion, which can heal 40 points of damage. I trade it to Hannis, as given I intend her as my tank, she would have more likely need of it in combat.
The Ignys army continues to tail me from the west, so I proceed through that mess of monster homes; I decide to sack the Darkling Shaman as he's just one and mostly casts crazy things like Shrink.
Divula resists his first attempt to cast Shrink.
He resists an attempt to cast Slow.
Yeeouch! He casts a Shadow Bolt at Divula, which she resists, but it still does 5 points of damage.
Hannis manages 3 points of damage against him, despite being shrunk (shrinking reduces damage someone can do).
He manages another Shadow Bolt at Divula for 8 points of damage which causes her to fall.
Hannis manages 2 more points of damage, bringing him down to 5.
The shaman casts Blindness at Pioneers (they aren't even armed, for Enchantress' sake! Go ahead, waste your turn casting that!  )
)
Hannis manages 2 more points of damage, bringing the Shaman down to 3 HP.
The Shaman then hits Hannis with a Shadow Bolt for 5 points of damage.
Hannis finishes the Shaman off with a 3 point hit. The +10 Accuracy spear definitely paid off for her ... too bad for my Sovereign she fell and gets no XP. Hannis gets 7 XP from the encounter, and my kingdom's coffers are restored by another 8 Gildar.
Hannis gains a level, giving me the following options:
- Brute - +3 attack vs opponents with a lower level
- Earth Disciple - enables Stoneskin (defense bonus enchantment on a unit vs Cutting and Pierce, but not Blunt)
- Tremor - Immobilizes a target and loses all their dodge for 2 seasons on the strategic map, can only be cast within your own territory
- Finesse - +3 attack vs. opponents with lower Initiative
- Potential I - +15% Experience
- Quick - +1 initiative
Several of these seem appealing, but given her lower damage weapon she's using for now but higher initiative, I opt for Finesse. She really needs to be putting out damage for now. It seems a bit short-sighted, given I don't intend to keep her with her current weapon for now, but we are scraping by the skin of our teeth here in battles and we cannot afford to lose many more.
The Darkling's camp yields a Dark Candle, which enables the holder to summon a Burning Wraith in combat (unfortunately its Tactical only, I can't summon a permanent Wraith on the strategic screen with it). I let Divula hang on to it for now, in case she gets into trouble on the Tactical Screen. We'll hold it in reserve for now.
Unfortunately, a Mites army blocks us from moving past the Darkling's camp, which is adjacent to the Ogre camp, to a safe tile to the southeast. I can go back and still have a tile to span away from the still-following Ignys army, but I decide to attack the Mite Mob instead (occupying a Lair to the west, not the blocking, mobile Mite army to the southeast) despite the fact that will consume my remaining move and leave me adjacent to the Ogre. Hopefully I'll get at least one turn grace.
I succeed in casting Slow at the highest-HP (24) 4-group of the Mites.
Unfortunately, the Mites Dodge first attempted attacks from both Divula and Hannis (66% chance to hit 4-8 damage). I manage to plow through victoriously, with Hannis taking only 3 damage whilst dishing out 86 points of damage throughout the fight, Divula taking no damage but dishing out 21 points and each getting 4 XP, and 6 Gildar. This levels up my Sovereign with the choice of Finesse, Potenial I, Quick, Spell Resistance I or Strength. It is, again, short-sighted as I don't intend her to keep the equipment such as the hammer, but I give her the bonus trait of Strength which improves her Initiative to 17 (due to an Initiative penalty she has that this trait would reduce with her current near-capacity encumbrance).
The Ogre neither menaces nor attacks, fortunately.
I decide to risk looting the Mite's camp, despite the fact that would put me adjacent to either the Ignys army or the Ogre again next turn ... it nets me an Ironeer Ale, a consumable that grants whomever drinks it +1 maximum Hit Points. Divula direly needs it, so she bottoms-up the ale.
I move the army back to adjacent to the Ogre. He again seems to ignore me, thankfully, and I move on to try again to claim that Wilding Camp loot next to my capital.
Aha! It yields an Adept's Robe, which grants +3 Spell Mastery (so Divula's Slow and Tame attempts will face lower resistances attempting to cast on enemies), AND lowers the cost of tactical spells 10% (so the 40 Mana cost of Tame will now be 40 - (10% of 40=4) = 36. Lower chance of failing to cast + lower cost of casting = double-win! It is 1 lower Defense than the Leather Cuirass, but I would definitely rather have the Spell Mastery and reduced spell mana cost.
I am going to ditch the Pioneers, let them hang out in New Pariden for now, and I'm going to have another go at Taming that Black Widow ... with 120 Mana saved up, I will try the second one farther west as well.
Heading west toward them, I find the Black Widow and Bear Cub have armied up together. I guess I could try to take both ... the Widow first; if I get her, I can web the Cub.
I try to intercept them, but they run ... no matter; that leaves the Black Widow's lair for me to loot, which contains a Vial of Poison. Every bit of damage helps, so I give it to Hannis and equip her with it (its an equippable item).
Bear cubs 'maul' -- if their attack lands, they will automatically get a free attack, and if that lands, will automatically get another free attack, and so and and so on until an attack misses (incurs a 'Dodge'). Each attack gets an accumululating penalty to accuracy, but the damage can rack up before then if the bear gets lucky or the victim has a low Dodge score. I leave Hannis to tank-absorb the cub's attacks while trying to scurry Divula over to the Black Widow.
With her levelling (which has improved her Spell Mastery) and recently acquired cloak, Divula's Tame incurs a mere 24% chance of being Resisted by the Black Widow; that is almost a 50% improvement (1 in 4 chance of being resisted now versus 1 in 3 previously).
Unfortunately, a mis-click on my part casts +Slow instead of Tame, and I pay the price ... I survive the Black Widow's attack back, but my second attempt to cast Tame (right spell this time) fails, and the Black Widow's second attack on Divula kills her.
The Bear cub, meanwhile, gets a couple of bites in, but Hannis manages to kill off the Black Widow. Hannis is left with 6 HP. She misses the cub, the cub lands another attack docking 3 more HP. With little choice, Hannis downs that wonderful Honey Nectar potion, restoring her to full HP before resuming her attack on the Cub. The Cub manages to get in a lucky triple-streak, landing 11 damage over 3 successive mauls (ouch!), leaving Hannis with 21/32 HP. She manages another strike on the cub, finishing it off.
She nabs 17 XP, and the army scores 1 Bear Pelt and 1 Spider Silk.
Sadly, of course, that Widow and Cub are not longer available to be Tamed, and my Sovereign is down to minimal (1) hit point with no XP gained from the attack since she fell.
Note to self: Do not attempt to play a game while writing a tutorial at a quarter to 2 a.m., it leads to deadly misclicks.
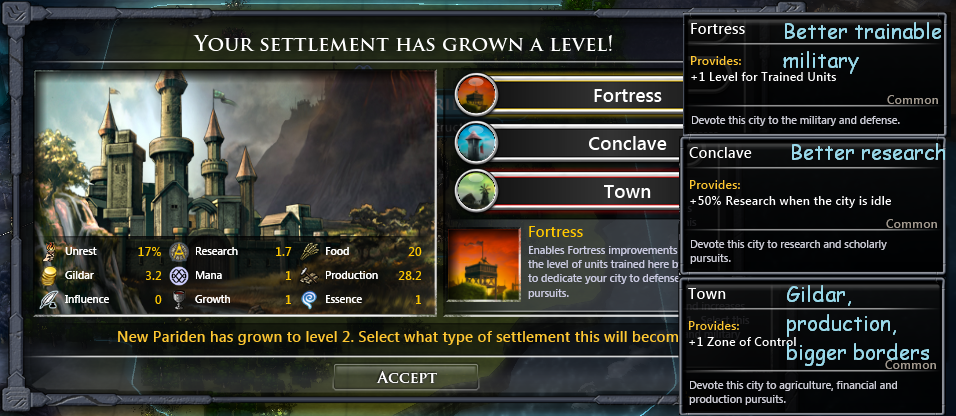
New Pariden finally achieves level 2. With most playstyles, at this point, blocked in from exploring and finding new city sites by powerful monsters, Fortress might seem the best option, but even if it were not for the fact I have Tame and can (and hopefully will) eventually be able to capture beasts to fight for me, the dire situation is being crippled by my slow research; my second tech Mining is still a ways off. It would take eons to research, say, Archery to be able to build a useful military anyway, so being stuck in my one city, I badly need research, so I choose the Conclave. This will immediately give me access to research-boosting buildings.
I decide to try my luck east again, I head off to that Darkling camp again to the northeast and that lone Darkling Lurker to kill him for the XP and loot his camp. Unfortunately, he insta-upgrades from a lone Darkling Lurker to a "Darkling Rider's Army" -- A rider (6 attack, 3 moves, 6 HP), two lone Darkling Warriors (3 attack, 5 HP each), and two 4-groups of Darkling Warriors (3 attack, 3 HP each). This seems potentially a bit overwhelming, despite the weak attacks, as I only have my two champions, but I proceed anyway.
The Rider gets first initiative and wipes out more than half of Divula's already low HP, knocking her down from 10/18 to 4/18, but Hannis kills the rider in one shot, and the remaining Darklings only have two movement points, so I can keep Divula safe from them through Hannis tanking.
I manage to achieve victory, Divula only taking those 6 points of a damage, Hannis absorbing 12 (but with her higher HP capacity and she was almost fully healed at the start of combat, that's not as hard as Divula losing 6). Both gain 9 XP, and coffers enriched by 15 Gildar.
The camp yields another Dark Candle. I give this one to Hannis, so each have one now if needed.
Checking the map, a 3 food/3 material spot I had not noticed has appeared to the northwest of New Pariden, between the Iron Ore and the Great Wolf Den. It is too close to the Ogre camp for my comfort, though, so I'm going to hold off until I can kill the Ogre (and hope to Tame the Great Wolf ... the Great Wolf is a great prize to have with any military, as it has an ability to grant all of my units on the battlefield an Attack bonus, even my Ranged units ... but as I mentioned, a web-casting Spider has highest priority, as that makes subsequent Tamings easier).
This is a good break point, tomorrow I will continue east toward that Air Shrill lair ...
